Setting up apollo-link-state for Multiple Stores
April 23, 2018 • 7 min read
I want to touch on how to set up apollo-link-state to allow for support of multiple stores without interfering with one another.
In my last post we went over how to setup apollo-link-state for basic use:
Now in this tutorial this is the moon we’re shooting for:
- Moving
withClientStateto its own file. - Moving specific resolvers and mutations to their own files.
- Writting an elegant way to merge together multiple stores.
- Adding a new Notes feature to the previous demo.
Lets Dive in! 🚀🌙
My biggest problem when using apollo-link-state
To kick this off I want to talk about the problem we are trying to solve.
It boils down to that CreateClientState expects only one value for defaults and one value for Mutations.resolvers which is incompatible if you have more than 1 object you want to store.
It’s incompatible because it forces us to keep the resolvers and defaults for multiple logically separate features in one place. OR if forces us to explicitly reference a resolver/default from a separate file every time we create one.
This is bad and in a medium to large app is a great way to make your logic hard to track.
How can we solve this
Thankfully the solution to this is really easy! It involves the following:
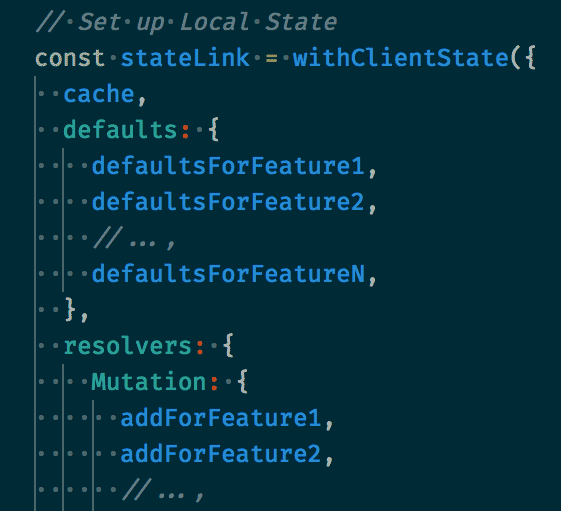
1. Move CreateClientStore out of our client.js file
Move the configuration of your client store to its own file to help highlight that this is a very specific and a very important piece in our application.
Our new client.js should look like this:
// client.js
import {InMemoryCache} from 'apollo-cache-inmemory';
import {ApolloLink} from 'apollo-client-preset';
import {ApolloClient} from 'apollo-client';
import CreateClientStore from './CreateClientStore';

// Set up Cache
const cache = new InMemoryCache();

// Set up Local State
const stateLink = CreateClientStore(cache);

// Initialize the Apollo Client
const Client = new ApolloClient({
  link: ApolloLink.from([
    stateLink,
  ]),
  cache: cache,
});

export default Client;
2. Move our defaults, resolvers, and @client queries to their own file
Break out the defaults and resolvers for a specific area of functionality into their own “store” files to help ensure as the application grows code is logically co-located.
// TodoStore.js
import gql from 'graphql-tag';
import {graphql} from 'react-apollo';
import compose from 'recompose/compose';

/*
  Defaults
*/

const todoDefaults = {
  currentTodos: [],
};

/*
  GraphQL
*/

const todoQuery = gql`
  query GetTodo {
    currentTodos @client
  }
`;

const clearTodoQuery = gql`
  mutation clearTodo {
    clearTodo @client
  }
`;

const addTodoQuery = gql`
  mutation addTodo($item: String) {
    addTodo(item: $item) @client
  }
`;

/*
  Cache Mutations
*/

const addTodo = (_obj, {item}, {cache}) => {
  const query = todoQuery;
  // Read the todo's from the cache
  const {currentTodos} = cache.readQuery({query});

  // Add the item to the current todos
  const updatedTodos = currentTodos.concat(item);

  // Update the cached todos
  cache.writeQuery({query, data: {currentTodos: updatedTodos}});

  return null;
};

const clearTodo = (_obj, _args, {cache}) => {
  cache.writeQuery({query: todoQuery, data: todoDefaults});
  return null;
};

/*
  Store
*/

/**
 * The Store object used to construct
 * Apollo Link State's Client State
*/
const store = {
  defaults: todoDefaults,
  mutations: {
    addTodo,
    clearTodo,
  },
};

/*
  Helpers
*/

const todoQueryHandler = {
  props: ({ownProps, data: {currentTodos = []}}) => ({
    ...ownProps,
    currentTodos,
  }),
};

const withTodo = compose(
  graphql(todoQuery, todoQueryHandler),
  graphql(addTodoQuery, {name: 'addTodoMutation'}),
  graphql(clearTodoQuery, {name: 'clearTodoMutation'}),
);

export {
  store,
  withTodo,
};
3. Tie it together with some lodash magic 🧙
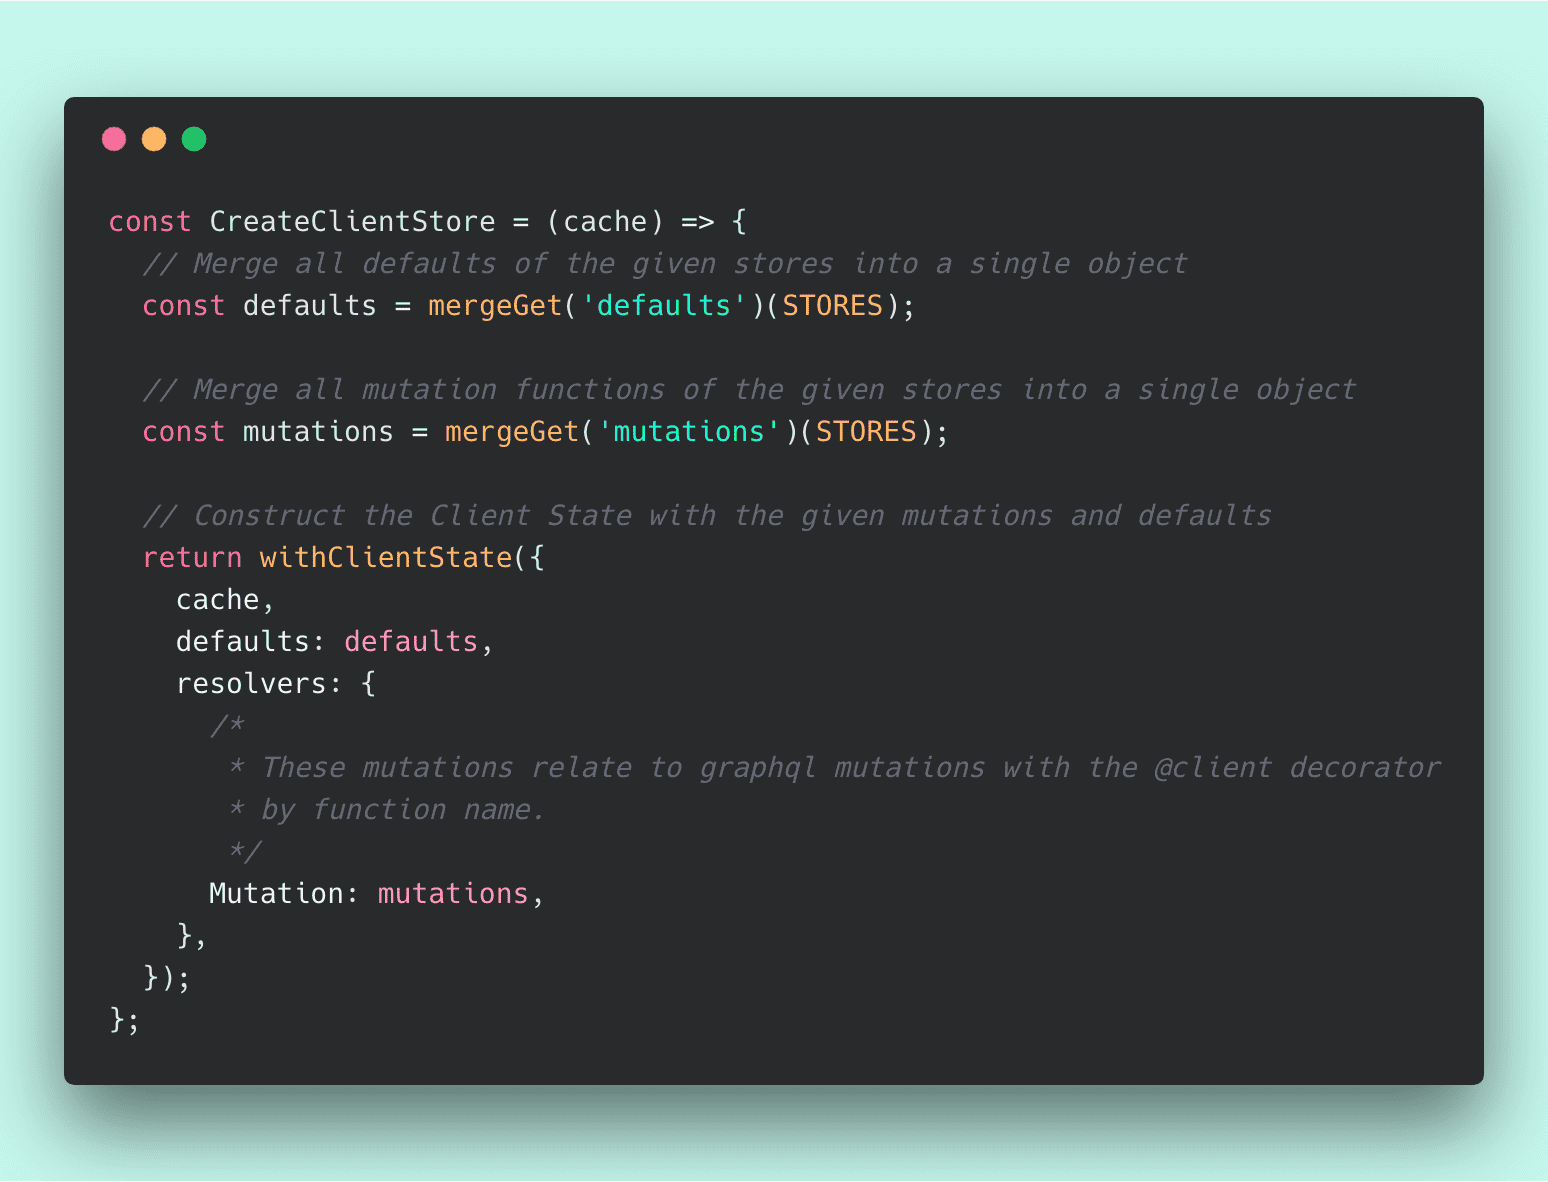
Finally we use some helpers from lodash to merge the export of each store file into one. This allows us to define resolvers and defaults in separate files and bring them back together during configuration.
Look at the _mergeGet_ function specifically to see how this occurs.
// CreateClientStore.js
import {store as todoStore} from './TodoState';
import {withClientState} from 'apollo-link-state';
import flow from 'lodash/fp/flow';
import assignIn from 'lodash/fp/assignIn';
import map from 'lodash/fp/map';
import reduce from 'lodash/fp/reduce';
const reduceWithDefault = reduce.convert({cap: false});

/**
 * At a given attribute this will merge all objects
 * in a list of objects found at that attribute.
 *
 * Example
 * const objectList = [
 *   {defaults: {x: true}},
 *   {defaults: {y: "foo"}},
 *   {defaults: {z: 123}}
 * ]
 *
 * // returns {x: true, y: "foo", z: 123}
 * mergeGet("defaults")(objectList)
 */
const mergeGet = (attributeName) => flow(
  // pick a single attribute from each object
  map(attributeName),
  // merge all values into a single object
  reduceWithDefault(assignIn, {})
);

/**
 * Local Data Stores
*/
const STORES = [
  todoStore,
];

/**
 * Map the Mutation handlers and Default Values of our local state to
 * the Apollo cache.
 */
const CreateClientStore = (cache) => {
  // Merge all defaults
  const defaults = mergeGet('defaults')(STORES);

  // Merge all mutations
  const mutations = mergeGet('mutations')(STORES);

  // Construct the Client State with the given mutations and defaults
  return withClientState({
    cache,
    defaults: defaults,
    resolvers: {
      /*
       * These mutations relate to graphql mutations with the @client decorator
       * by function name.
       */
      Mutation: mutations,
    },
  });
};

/**
 * Export
 */

export default CreateClientStore;
Adding another feature becomes easy-peasy
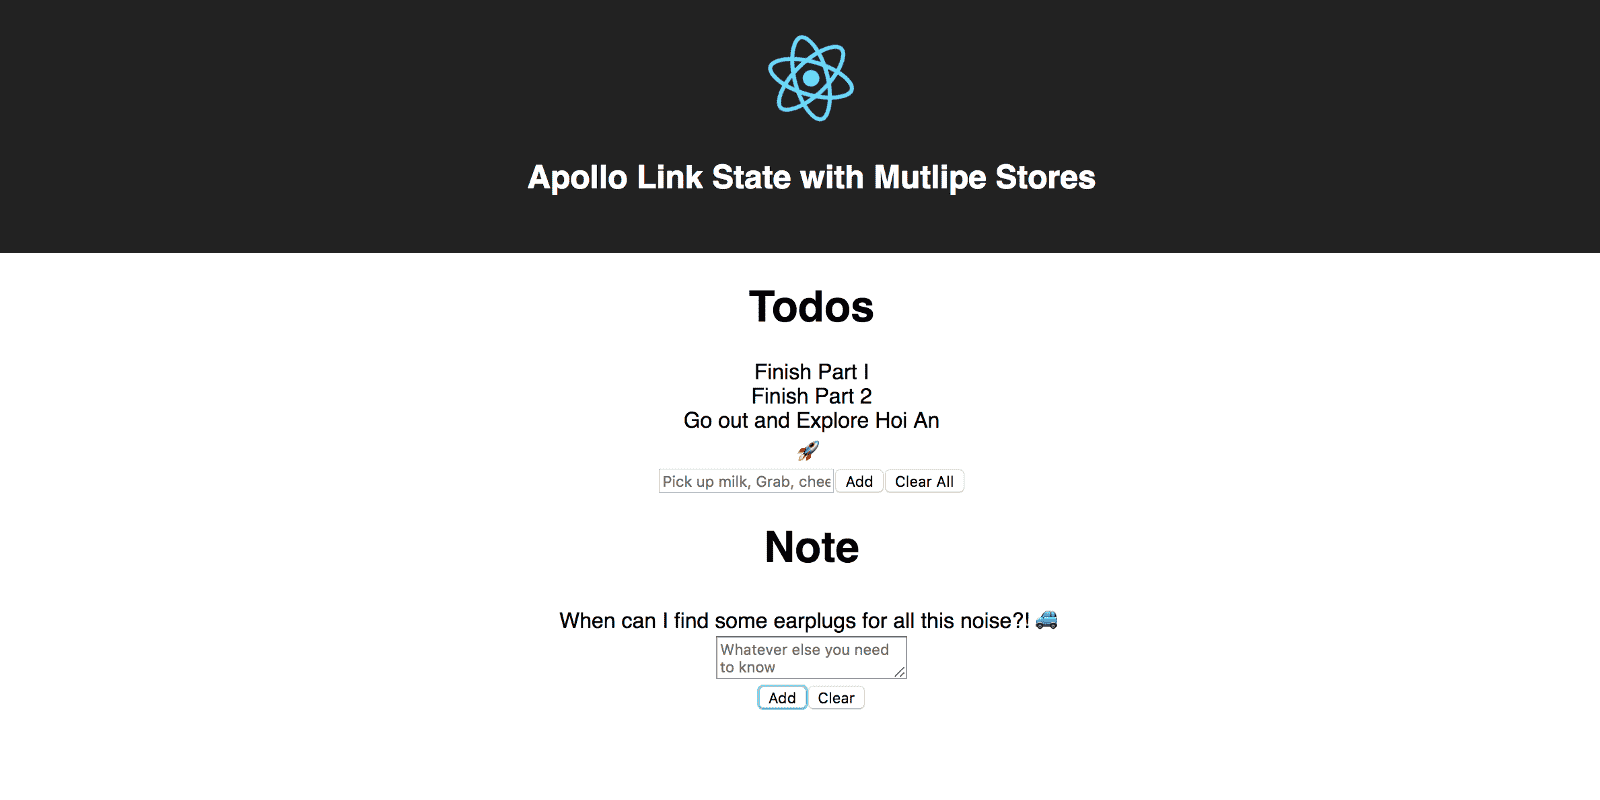
Now that we have the above infrastructure in place adding a second feature is just as easy as adding the 100th feature.
Lets test out this statement by adding a Freeform notes field to the application.
1. Create the Notes Store
Nearly identical to the Todo Store above.
// NoteStore.js
import gql from 'graphql-tag';
import {graphql} from 'react-apollo';
import compose from 'recompose/compose';

/*
  Defaults
*/

const noteDefaults = {
  savedNotes: "",
};

/*
  GraphQL
*/

const notesQuery = gql`
  query GetNotes {
    savedNotes @client
  }
`;

const clearNoteQuery = gql`
  mutation clearNote {
    clearNote @client
  }
`;

const updateNoteQuery = gql`
  mutation updateNote($text: String) {
    updateNote(text: $text) @client
  }
`;

/*
  Cache Mutations
*/

const updateNote = (_obj, {text}, {cache}) => {
  // Update the cache
  cache.writeQuery({query: notesQuery, data: {savedNotes: text}});

  return null;
};

const clearNote = (_obj, _args, {cache}) => {
  cache.writeQuery({query: notesQuery, data: noteDefaults});
  return null;
};

/*
  Store
*/

/**
 * The Store object used to construct
 * Apollo Link State's Client State
*/
const store = {
  defaults: noteDefaults,
  mutations: {
    updateNote,
    clearNote,
  },
};

/*
  Helpers
*/

const notesQueryHandler = {
  props: ({ownProps, data: {savedNotes = ""}}) => ({
    ...ownProps,
    savedNotes,
  }),
};

const withNotes = compose(
  graphql(notesQuery, notesQueryHandler),
  graphql(updateNoteQuery, {name: 'updateNoteMutation'}),
  graphql(clearNoteQuery, {name: 'clearNoteMutation'}),
);

export {
  store,
  withNotes,
};
2. Hook up the new Store
Import the new store into CreateClientStore.js and add it to our STORES.
// CreateClientStore.js
import {store as noteStore} from './NoteStore';

// ...

/**
 * Local Data Stores
*/
const STORES = [
  todoStore,
  noteStore,
];
3. Create the Note Component
Now that we have the store created and wired in it’s time to put it all to use.
// Notes.js
import React from 'react';
import compose from 'recompose/compose';
import withState from 'recompose/withState';

import {withNotes} from './NoteStore'

const NotesPure = ({
  savedNotes,
  updateNoteMutation,
  clearNoteMutation,
  noteText,
  setNoteText,
}) => (
  <div>
    <h1>Note</h1>
    <div>{savedNotes}</div>
    <div>
      <textarea
        value={noteText}
        onChange={(e) => setNoteText(e.target.value)}
        placeholder='Whatever else you need to know'
      />
    </div>
    <div>
      <input type='submit' value='Add' onClick={(e) => {
        updateNoteMutation({variables: {text: noteText}});
        setNoteText("")
      }} />
      <input type='submit' value='Clear' onClick={(e) => clearNoteMutation()} />
    </div>
  </div>);

const Notes = compose(
  withNotes,
  withState('noteText', 'setNoteText', ''),
)(NotesPure);

export default Notes;
4. Add to app.js
Finally add our new component to our <App/> container.
// App.js
import React from 'react';

import TodoList from './TodoList'
import Notes from './Notes'

import logo from './logo.svg';
import './App.css';

const Header = () => (
  <header className="App-header">
    <img src={logo} className="App-logo" alt="logo" />
    <h1 className="App-title">Apollo Link State with Mutlipe Stores</h1>
  </header>);

const App = () => (
  <div className="App">
    <Header/>
    <TodoList/>
    <Notes/>
  </div>
);

export default App;
See it in action!
You should now be able to run the update demo and see our new note’s feature in action. Simple.
Wrap up
I wanted to put this out because I think this Apollo’s version of maintaining local state has some real potential and as a young project the more support it gets the more we should see if grow and thrive.
Part of supporting a project is learning how to use it and learning how to improve on it. I hope this helps do both!
Happy coding!
🧞 This is open source! you can find it here on Github
❤️ I only write about programming and remote work. If you follow me on Twitter I won’t waste your time.